Scheduler settings
General
Default working hours
The DEFAULT WORKING HOURS are universally applied within the company unless specific working hours are indicated in the LOCATION SETTINGS. Specialist working hours can either follow the default schedule or be customized based on the specialist's availability.
Default working hours also influence time range auto scrolling for schedules, allowing users to efficiently set up working hours for locations, specialists, and schedule templates. Auto scrolling will commence from the Default Working Hours’ start time. This applies to:
- Selecting working hours for a location
- Creating a new schedule or a schedule override for a specialist
- Adding a new schedule template
Specialist working hours
These settings define how working hours are assigned to newly created specialists and determine whether they follow a shared schedule or an individual one. When creating a new specialist, the system applies one of the following behaviors based on the selected option:
Use default working hours
The specialist will automatically inherit the global schedule configured in Scheduler settings. This option is typically used when:
- Most specialists follow the same working hours
- You want to keep scheduling simple and standardized
Use specialist schedule
The specialist will be created with “Use specialist schedule” enabled by default. This allows the specialist to have their own individual working hours, separate from the clinic’s default schedule.
Their availability can be customized using:
- Personal working hours
- Schedule templates
- Overrides (e.g., exceptions, time off)

See the sections below for details on Specialists and Schedule Templates.
This option is useful when:
- Specialists have different shifts or flexible hours
- You need more precise control over individual availability
Appointment statuses
Default appointment statuses
Configuring default appointment statuses helps standardize appointment creation by automatically assigning the appropriate status to new appointments. Separate defaults can be defined for appointments created in Manage, via Online Booking, or through the Public API.
The default appointment statuses dropdown list is configurable.
The default appointment statuses dropdown list is configurable.
Mandatory appointment status
The "Appointment status required" setting can be enabled to require a status for all appointments. This option is turned off by default but can be enabled at any time.
NOTE: When activated, the setting affects appointments created in Manage, through Online Booking, and via Public API. It does not apply to appointments created through external integrations with their own booking rules, such as NHS eRS.
HOW IT WORKS
When OFF
- Appointments can be created or edited without a status.
- Online bookings continue to function as usual.
- Appointments created via the Public API continue to follow existing behavior.
When ON
- Both a default status and an online booking default status must be defined.
- A status is required for all newly created or updated appointments.
- Appointments cannot be saved without a status, and users are prompted to complete the required field.
- Online bookings will not be completed if the configured default status is missing or inactive.
- Appointments created via the Public API without a status are rejected.
- Existing appointments are only affected if they are edited.
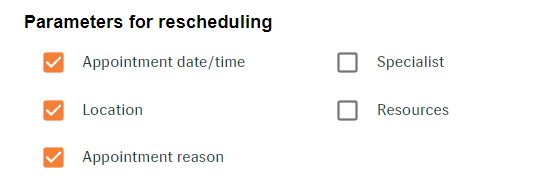
Parameters for rescheduling
Appointment PARAMETERS can be configured to initiate a RESCHEDULING event. Any changes made to the selected settings in an appointment will result in the appointment receiving the status 'rescheduled'.
Rescheduled appointments
You also have an option to display RESCHEDULED APPOINTMENTS on the Patient Summary tab. This allows for easy access to information regarding any appointments that have been rescheduled.
Designated appointment
In the DESIGNATED APPOINTMENT section, clinics can activate the ‘Booking for Any Reason’ option. This feature removes existing restrictions on time slots reserved by schedule templates for specific appointment reasons, making those times available for general bookings as needed. Clinics can also define how many days in advance this flexibility will apply (e.g., for today and the upcoming days).
Even with ‘Booking for any reason’ enabled, the Scheduler grid will show only the primary appointment reasons assigned to a specialist. This helps users identify the main reasons while still allowing other bookings if needed.
Timeslot visualization
The Timeslot Visualization setting controls how available timeslots are displayed in the Scheduler grid view, Schedule Templates, and Specialist Schedules. Administrators have the ability to configure whether timeslots with the same appointment reasons should be merged or shown individually. This enhancement provides greater flexibility and control over how appointment availability is presented to users.
REQUIRED PERMISSIONS
Access to this setting requires the ViewSchedulerSettings permission.
HOW IT WORKS
When merging is enabled:
- Timeslots with identical appointment reasons are grouped together in Schedule Templates and individual Specialists' schedules.
Timeslot configuration before saving - tasks are separated by hour and reason.
Timeslot configuration after saving - consecutive timeslots with identical reasons are merged. - In the Scheduler grid, merged timeslots are grouped together and visually highlighted in grey, which can be seen on hover.
When merging is disabled:
- Timeslots are displayed individually, exactly as configured in the Specialist schedule (Schedule Template).
- This provides a more granular view of availability in the Scheduler UI (day and week views).
Closed days
Closed days are added either for one location at a time or all locations. To add a closed day, click +CLOSED DAY.
Resource types
It is possible to add a number of resource types that will be used to group your locations resources (rooms, different types of equipment).
Resources
This tab allows you to add resources to a particular location. To add a resource, click +RESOURCE. On the dialog, specify:
- RESOURCE*: once the resource is saved, the name provided in the field will be impossible to change.
- LOCATION*: once the resource is saved, the location specified in this field will be impossible to change. NOTE: Only ONE location can be specified per resource.
- RESOURCE TYPE*: from the dropdown, select a resource type.
- CONFIRM AVAILABILITY*: choose "yes", "no", or "warn".
"Yes" - to show a conflict message when someone is trying to book this resource for the same time; this will also prevent an appointment from being created."No"- to allow a resource to be booked for several appointments simultaneously; the appointment will be created with no warning."Warn" - to show a warning message that this resource is already booked; the appointment will be created and the user will be notified with a warning.
- COLOR: choose any color from the palette for better visualization.
Resource list can be ordered by state (active/inactive), resource name and color parameter.
Outcomes
'Active' outcomes can be linked to a particular appointment reason. When a reason is selected for an appointment, any of the outcomes associated with that reason can be added to that appointment.
To add an outcome, click +OUTCOME. On the dialog, specify:
- Code
- Rating (if applicable)
Outcomes' list that can be ordered by state (active/inactive) and code.
Appointment statuses
Statuses can be assigned to appointments in Scheduler.
To create a status, click the +APPOINTMENT STATUS. On the dialog, specify:
- Code (one character)
- Description
Appointment statuses' list can be ordered by all available parameters.
Locking appointments
'Lock appointments' is an optional setting. When activated for an appointment status, it protects appointments that were assigned this status from any unauthorized changes.
Required confirmation
Via statuses, it is possible to manage appointment confirmations by selecting the corresponding option under "Confirmation type required". Note that not all statuses can be associated with confirmation types.
For more information, see details on CONFIRMATION TYPES in the corresponding section below.
Appointment status icon
When creating or editing a status, use the icon picker to:
- Choose a color from the available options
- Select an icon from the supported set
- Optionally leave the icon unassigned or remove it later
To create an appointment status, click +APPOINTMENT STATUS.
To edit an appointment status, click on the respective entry in the list of statuses. Alternatively, hover over a status, click the three-dot control that appears and select EDIT.
View icons in Scheduler
Configured icons appear next to appointments in Day, Week, and Schedule views. If an appointment is part of a recurring series, a recurrence icon is shown alongside the status icon.
View icons on the Dashboard
Status icons are also displayed in the Appointments list on the Dashboard. This provides quick visual cues without needing to open individual appointments.
Appointment types
Appointment types can be used to classify appointment reasons. To add an appointment type, click +APPOINTMENT TYPE. On the dialog, specify:
- Type
- Description
- Duration
- Color
Optionally, you can configure additional settings below. This includes the ability to make specific appointment details mandatory, like assigning a resource or connecting an appointment to a marketing campaign. You can also allow users to delete appointments or make appointments of certain types recurrent.
Appointment types' list can be ordered by any available parameters.
- To EDIT an appointment type, click on the selected entry in the list.
- On the EDIT screen, you can DELETE an appointment type by clicking
in the top right corner.
Appointment reasons
Appointment reasons can be used to apply default settings to an appointment. When an appointment is created in Scheduler and a specific reason is specified, the pre-configured settings associated with this appointment reason will control how this appointment is managed (e.g., which duration will be preselected, which resources will be available and which outcome can be chosen for this appointment, etc.).
To add an appointment reason, click +APPOINTMENT REASON. On the dialog, you can specify:
- Appointment reason (i.e., name)*
- Appointment type
- Duration
- Color (open the dropdown for more options)
- Category*
- Outcome
- Additional settings (see image below)
NOTE: Additional settings are inherited from the selected APPOINTMENT TYPE. However, they are not fixed and can be adjusted to better fit the intended use.

*After saving an appointment reason, you will not be able to modify its NAME and CATEGORY. Therefore, ensure that these parameters are correct before you proceed to finalizing the appointment reason.
Appointment reasons' list can be ordered by any available parameter.
- To EDIT an appointment reason, click on the selected entry in the list.
- On the EDIT screen > GENERAL tab, you can make the required changes or DELETE an appointment reason by clicking
Resource validation
Within an appointment reason it is possible to set resource validation at the location level. This is done in EDIT mode.
- To access this mode, click on the selected entry and go to the RESOURCES tab.
- Select VALIDATE RESOURCES.
- Choose the LOCATION where a resource (or resources) need to be validated.
- Select from the available resources and click SAVE.
Customization for Online Booking
For appointment reasons included in the Online Booking category, you can configure patient-friendly titles and descriptions. These are displayed to patients when booking appointments online, allowing you to present clearer and more understandable information.
To configure a title and description:
- Click on the selected Appointment Reason to access EDIT mode.
- Navigate to the ONLINE BOOKING tab.
- Enter the NAME and DESCRIPTION in the respective fields.
- SAVE.
If no online booking name or description is configured, the system automatically uses the internal appointment reason name.
Appointment labels
On this tab, users can configure appointment labels that suit the needs of their office or clinic. Labels can then be added to appointments in SCHEDULER. To add a label, click +LABEL.
On the dialog, specify:
- Code
- Name
Appointment labels list can be ordered by all available parameters.
Specialist categories
Specialist categories can be used to group specialists. To add a category, click +CATEGORY.
On the dialog, you can specify:
- Code
- Description
Specialist categories' list that can be ordered by all available parameters.
Confirmation types
As a clinic administrator, you can oversee appointment confirmations using customized Appointment Confirmation Types. By incorporating these confirmation types into your workflow, you can enhance patient management and scheduling while gaining valuable insights into appointment trends and overall efficiency in management. This includes:
- Reducing no-shows and cancellations (Identifying the most effective confirmation methods, such as SMS, helps minimize no-shows).
- Optimizing appointment availability (Streamlined communication based on preferred confirmation methods improves scheduling efficiency).
Managing confirmation types
The list of appointment confirmation types is fully customizable; it can contain only those confirmation types that meet the needs of your clinic or office.
- To create a confirmation type, use the +TYPE control and provide a unique name.
- After setting up all the necessary confirmation types, you can further customize the list by adding new options or updating, deactivating, or removing existing ones as needed.
NOTE: Confirmation types can only be used in association with appointment statuses. This association is established on the APPINTMENT STATUSES tab via the "Confirmation type required" setting that is activated for the corresponding appointment status. Enabling this setting on a certain appointment status ensures that all active confirmation types become available for selection when this appointment status is chosen in the CREATE/EDIT APPOINTMENT dialog.

Once an appointment confirmation type is assigned to an appointment, it cannot be deleted, only set to inactive. This is done to ensure data integrity and maintain accurate historical records of appointment confirmations.
Specialists
Adding specialists
On this screen you can add a specialist and assign them to a chosen location. In Scheduler, all assigned specialists will be shown for that location.
In CREATE mode, it is possible to assign a specialist to ONE location only. In EDIT mode, you can link up to TEN locations.
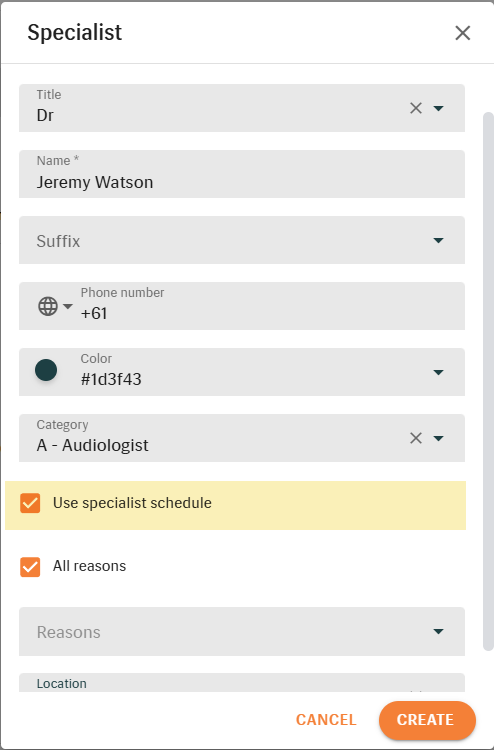
To add a specialist, click +SPECIALIST. On the dialog, you can specify:
- Title
- Name
- Suffix
- Phone number
- Color
- Category
- 'Use specialist schedule' if the specialist's working hours differ from the default working hours
- 'All reasons' if the specialist handles all available services (hearing tests, earwax removal, hearing aid fittings, etc.)
- Location
[Country specific]
- QP number
- NPI number
Specialists' list that can be ordered by: state (active/inactive), name, phone number, category, color, all reasons' setting. You can search the list by NAME and PHONE NUMBER using the search bar. It is also possible to filter the specialists' list by location.
Editing specialist info
To be able to access and edit specialist information, click on the specialist entry or hover over and select the corresponding option from the options menu  .
.

On the GENERAL tab, you can:
- Review and update the specialist’s information
- Assign additional locations
- Choose to 'use specialist schedule'
- Add more locations
- If needed, define a QP number for each location
The SCHEDULE and OVERRIDES tabs will only be available when you turn on the 'use specialist schedule' option and save your changes.
On the SIGNATURE tab, you can upload a PNG signature for use across patient documents, improving documentation workflows.
Customizing schedules
On the SCHEDULE tab, you can create weekly, biweekly, and custom schedules. You can also change existing specialist schedules by adding or removing weeks without needing to create a new schedule.
To add a new schedule, click +SCHEDULE.
The list of specialist schedules can be sorted by the START or the END date. Each schedule can be previewed and edited directly from the list.
- To change the START/END dates, click
.
- To add new working hours, click +WORKING HOURS.
- To change the existing working hours, hover over the location where the hours need to be changed, click
Overriding schedules
On the OVERRIDES tab, you can create schedule overrides at a specialist's level. When you create an override, the system will review the specialist’s schedule to see if any appointments are booked for the specified date.
If there are appointments, a warning will appear to inform you of the potential impact, but it will not prevent you from proceeding with the override.
Signature configuration
On the SIGNATURE tab, you can upload a scanned specialist signature for use in patient and financial documents. The uploaded signature can be inserted into document templates where a specialist signature is required.
If your organization does not use scanned signatures, this tab can be left empty. In this case, any signature insert fields used in templates will remain blank.

Only one signature can be stored per specialist. If a signature is replaced, the updated image is used in all newly generated documents.
To add a signature:
- Click +SIGNATURE.
- Upload a PNG file.
- Use signature insert fields when configuring templates for Patient letters, Appointment reports and Battery & Maintenance Claims:
Specialist (kept in Patient's Personal info)Appointment specialist
All existing templates are automatically migrated to the new placeholder format (e.g., from
{Specialist} to {Specialist.details.Specialist.name}). The new placeholders behave the same as the previous ones.Cancellation reasons
Cancellation reasons are used to explain why an appointment was canceled. Once a 'canceled' status is given to an appointment, the dropdown with the cancellation reasons becomes available. To add a cancellation reason, click +CANCELLATION REASON. On the dialog, you can specify:
- Code
- Description
Cancellation reasons with a selected 'NHS' parameter are available for eRS appointments only. In-store and online appointments can use all cancellation reasons.
Cancellation reasons' list that can be ordered by all available parameters.
Rescheduling reasons
On this tab, you can configure custom rescheduling reasons to enhance appointment management. Rescheduling reasons can be edited, deleted, or disabled if no longer in use.
Reason sources
Reason sources identify the origin of an appointment rescheduling or cancellation, whether it was initiated by the patient, the clinic, or caused by force majeure. Users with the corresponding permissions can customize the Reason Source list by adding, editing, or deleting reason sources to ensure accurate reporting and better manage client appointments.
Schedule templates
Schedule templates allow users to block specific time slots for certain appointment reasons across multiple specialists. This helps to save time and ensures that high-demand hours are prioritized for more valuable services.
Create schedule templates
- To create a new template, click + TEMPLATE.
- For each day of the week, users can define which Reasons are allowed in which time slots, with up to 15 slots per day.
- PREVIEW the schedule to see how it will look in the Scheduler before applying.
- Different templates can be applied to different locations and for different weekly cycles (up to 10 weeks).
Example: Two reasons set up between 10:00 a.m. and 12:00 p.m.
Apply schedule templates
- Find the needed template and hover over the three-dot menu.
- Click APPLY.
- Choose the start/end dates, locations, and specialists it will affect.
Templates:
- Can only be applied to specialists who have the USE SPECIALIST SCHEDULE setting enabled.
- Only impact the working hours defined by the location (or the specialist’s existing schedule).
- Any unblocked hours will automatically be available for all appointment reasons.
The applied template will be displayed in each specialist’s schedule.
Preventing time overlap
To avoid conflicts, ensure that the number of weeks set for each location is a multiple of the schedule at the first location. For instance, if one location uses a biweekly schedule, other locations should follow schedules in multiples of the same (1, 2, 4, 6, or 8 weeks) to prevent overlap.
Related Articles
Company settings
Default settings These settings are accessible to admins only. They are applied company-wide to users who have not configured their own settings. See how to configure your own settings in MY PROFILE. Default environment: this field will show which ...Notification settings
Patient notification functionality allows clinics to send information to their patients about scheduled appointments. Notifications are sent if: Notification/Message template exists; A patient gave their consent to receive notifications; During ...Company and Environment Settings
This course is tailored for administrative users of Manage, focusing on mastering navigation across various settings related to your company and environment, which include: Scheduler Settings Notifications and Surveys Claim Configuration Location ...Scheduler
Scheduler allows for fast setup and effective management of client appointments in different locations. Filter appointments Scheduler can display a schedule for location, a specialist as well as a schedule for a Resource such as a sound booth or a ...Appointment Scheduler
Welcome to the online training module on the scheduling features of Auditdata Manage! In this module, you'll learn to adeptly manage the appointment scheduling needs of your hearing care practice using Manage's sophisticated capabilities, including: ...