Public Release Notes - Manage 11.10.0
About this release
February 3, 2026, Manage 11.10.0
Manage 11.10.0 introduces powerful new capabilities to enhance inventory control, scheduling efficiency, clinical data visualization, and patient data accuracy, along with several usability improvements to streamline daily workflows.
Key highlights include:
- Configurable Serial Number Entry: Users in New Zealand can now control whether serial numbers must be added during sale creation or only after invoicing.
- Flexible Serial Number Uniqueness: Clinics can allow identical serial numbers across different products from the same manufacturer.
- Hearing Instrument Trials: US clinics can now start, manage, complete, and cancel serialized hearing aid trials within sales and quotes.
- Default Appointment Statuses: All clinics using Manage can set automatic default statuses for appointments created in Manage, Online Booking, or via API.
- Speech Graph in Clinical Details: A new graphical Speech view is now available across Clinical Details, Appointment Summaries, and Appointment Reports, providing clearer visualization and interpretation of key Speech metrics.
- New Regional Reports: New HI Trials (US) and Open B&M Claims (AU) reports provide clearer visibility into trial activity and HSP claim processing.
1. WHAT'S NEW
ENVIRONMENT SETTINGS
[NZ] Control Serial Number Entry on Sale
Environment settings > Finance settings > Sale related > S/N handling
The "Prohibit to add a product S/N when creating a sale" option is now available for users in New Zealand. This setting allows administrators to control whether serial numbers can be entered when creating a sale.
KEY BENEFITS
- Flexible workflows
Choose whether serial numbers must be added during quoting or only after invoice creation. - Fewer errors
Prevent premature assignment of serial numbers when your process requires final confirmation at invoicing. - Administrative control
Only users with permission to edit Finance Settings can change this behavior.
HOW IT WORKS
- If enabled: Users cannot enter serial numbers when creating a draft sale or quote, and the S/N field on the draft sale form remains inactive. Serial numbers can only be added after the invoice is created.
- If disabled: Serial numbers can be added during sale creation. The S/N field on the draft sale form remains active.
[ALL] Enable Same Serial Numbers
Environment settings > Inventory settings > Serial number
A new option has been added to Inventory Settings to give you more flexibility when working with serial numbers. The new “Enforce serial number uniqueness by product” attribute lets you use the same serial number across different products from the same manufacturer. By making serial number validation configurable, you can align Manage’s system rules with your existing manufacturing and supply workflows. By default, this attribute is set to false, preserving the current behavior where Manage enforces serial number uniqueness across the same manufacturer.
REQUIRED PERMISSIONS
To access and modify this setting, users must have both of the following permissions:
- ViewInventorySettings
- EditInventorySettings
WHERE IT APPLIES
This setting affects how serial numbers are handled across key inventory activities, including:
- Sales
- Trials
- Orders
- Repairs
- Transfers
- Exchanges and replacements
- Loss & Damage processes
WHERE IT DOES NOT APPLY
The setting does not apply to the following statuses. For these items, using the same serial number is always allowed:
- Returned to Supplier
- Removed
PATIENTS
[US] Products on Trial
Environment settings > Inventory settings > Trial settings / Trial cancellation reasons
Patients > Patient sale / Summary / Equipment
Trial management and reporting is now available for users in the US, allowing clinics to start and manage trial periods for serialized hearing aids during quote creation or at the point of sale. Users can select an eligible product, set the trial dates, and begin the trial – the system then updates the product status and creates a trial document.
Trials can be completed (when an invoice is created) or cancelled, with options for handling the serial number.
PREREQUISITES
- Trial must be activated via Inventory Settings before the functionality becomes available.
- “Prohibit to add a product S/N when creating a sale” must not be enabled. If activated, the trial functionality becomes unavailable, as serial numbers cannot be assigned during the sale process.
HOW IT WORKS
1. Starting a Trial
- A trial can be initiated during a sale or after a quote is created.
- You select an available serialized product for trial.
- The system prompts for trial start and end dates, with default durations configurable in Inventory Settings.
- The trial period can be adjusted if needed.
2. Trial Activation
When a trial begins:
- The product status changes to "On Trial".
- A trial document is automatically created.
- Users can edit the document later to change the end date.
3. Completing a Trial
- If you want to complete a Trial and proceed with invoice generation, click the Invoice button. Before the trial is finalized through invoice creation, the system displays the following message:
- Creating the invoice:
- Automatically marks the trial as Completed.
- Locks the trial document from further editing.
- Changes the product status to "Delivered".
4. Cancelling a Trial
Cancelling a trial requires:
- A cancellation reason.
- A decision about what to do with the serial number (e.g., return to stock).
After cancellation:
- Both the product and trial document display a Cancelled status.
- The associated sale cannot proceed unless other products remain on the sale.
5. Printing a Trial Agreement
A trial agreement can be printed using the dedicated control:
If multiple templates are available, Manage will prompt you to choose which one to use before printing. Templates can be configured in Environment settings > Print settings > Printing templates.
SCHEDULER
[ALL] Default Appointment Statuses
Scheduler
Clinics can now streamline appointment creation by configuring default appointment statuses. This ensures that new appointments automatically start in the correct status without requiring manual input. Different defaults can be set for appointments created in Manage, booked through Online Booking, or created via Public API, giving clinics greater control over how appointments enter their workflow.
HOW IT WORKS
1. Accessing the Configuration
The default status settings are available in: Environment settings > Scheduler settings > General tab
The Default statuses dropdown list is configurable.
The list of available default statuses is sourced from the Appointment statuses tab.
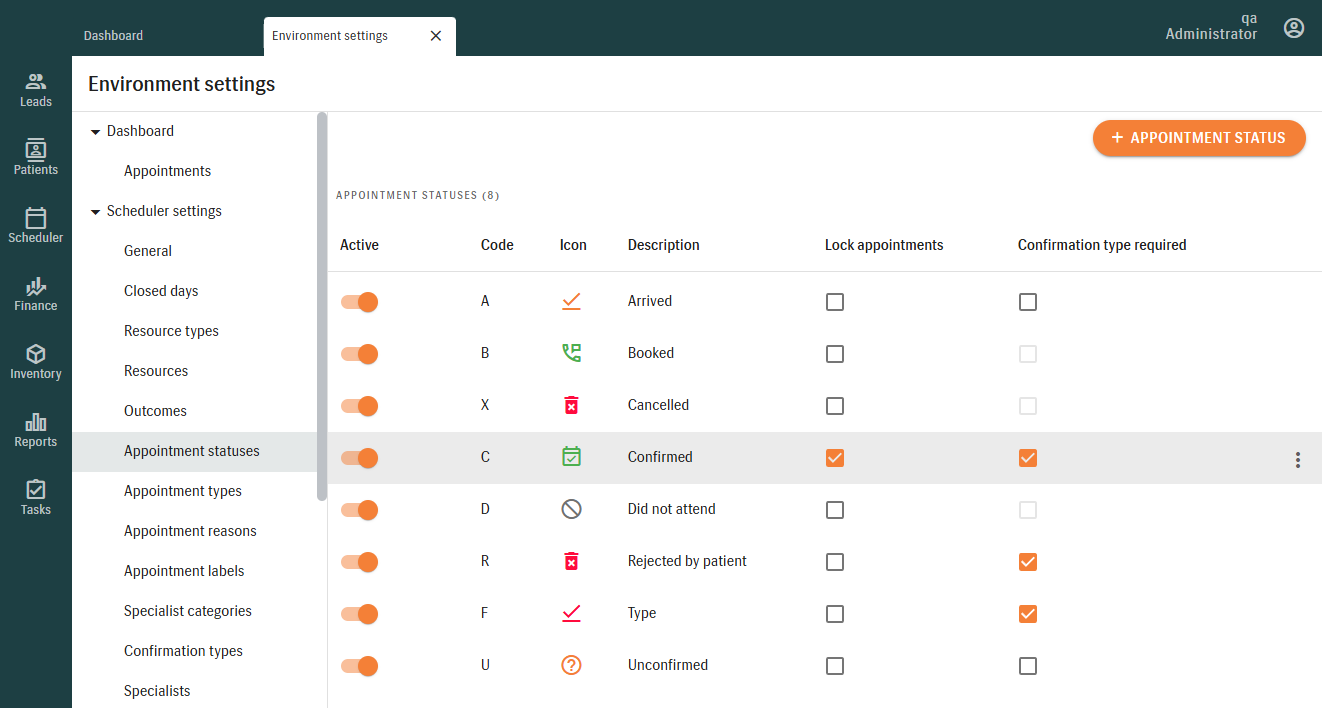
- The Cancelled (code: X) and Did not attend (code: D) statuses are excluded by default.
- Any status with "Confirmation type required" enabled will not appear in the Default statuses dropdown.
2. Configuration Rules
Only one default status can be assigned for:
- Appointments created in Manage/via Public API
- Appointments created via Online Booking
NOTE: By default, no status is preselected until configured.
3. Creating an Appointment
When an appointment is created in Scheduler, the configured default status is automatically applied.

If you are using SMS appointment confirmation, please ensure your default appointment status is set to Booked so that SMS messages work correctly.
PATIENTS
[ALL] Speech Graph in Patient's Clinical Details
Patients > Clinical data
A new Speech Graph has been added to Manage, giving clinicians a clearer, more visual way to review and explain speech‑related test results. Until now, only Pure Tone graphs and Speech tables were available. This update adds a full graphical view of key Speech metrics — making clinical interpretation faster and improving the quality of information shared with patients and referrers.
This enhancement uses the existing Speech graph component and extends it across the Clinical Details (Clinical data tab), Appointment Summary (Appointments tab), and Appointment Reports. As part of this update, Speech data now appears on its own tab, following the restructuring of the Clinical data view into three separate tabs — Hearing Loss, Pure Tone, and Speech — to improve navigation and accessibility.
Appointment Summary
On the Appointments tab, Speech data is displayed within the relevant Clinical session [date] [time] section of the appointment summary for the selected appointment. The Speech tab within this section provides access to the Speech Graph and the associated Speech results recorded for that appointment.
Appointment Reports
Appointment Reports now support two new insert fields — Speech audiogram and Speech legend — allowing Speech Graphs to be included in printed or exported reports whenever Speech data is available. These insert fields can be added to Report templates via Environment settings > Patient letters > Appointment report templates.
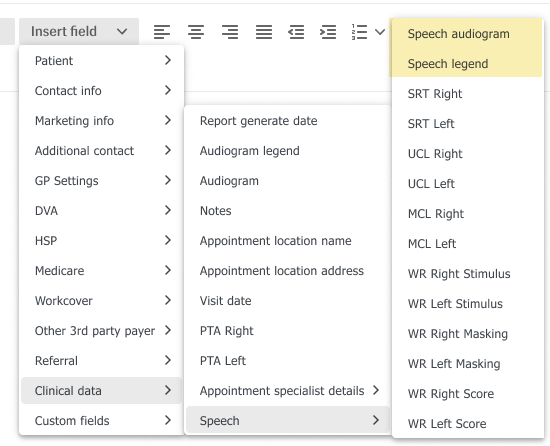
- The graph and legend follow all configured country‑specific symbol rules, ensuring consistency with regional clinical standards.
- The legend is context‑aware and displays only the symbols relevant to the Speech tests shown in the report.
REPORTS
[US] HI Trial Report
Reports > Trials
The HI Trials report is now available for users in the United States. This report provides Hearing Care Providers (HCPs) with a detailed overview of their hearing instrument trials, including key information such as trial dates, patient details, assigned specialists, product data, and trial duration. These insights help HCPs efficiently track trial progress and manage their hearing instrument inventory.
[AU] Open B&M Claims Report
Reports > Finance
Users in Australia can now access the new Open B&M Claims report, designed to improve visibility into Battery & Maintenance (B&M) claims that have been generated but are still awaiting patient approval under the Hearing Services Program (HSP). The report outputs key patient and claim details – including contact information, B&M plan expiry date, claim date, and identifiers – allowing clinic staff and managers to follow up efficiently and ensure claims progress smoothly.
2. IMPROVEMENTS
SYSTEM
[ALL] Top‑Right Positioning of Pop‑Up Notifications
With this improvement, pop‑up notifications were moved from the bottom‑right to the top‑right corner, ensuring that buttons at the bottom of the screen remain fully visible.
ENVIRONMENT SETTINGS
[ALL] Improved Management of Product Colors
Environment settings > Inventory settings > Product colors
The updated Product Colors functionality gives you more control over maintaining your color list, even when colors are already in use. The new behavior ensures that inactive colors no longer appear where selection is required, while still preserving visibility for historical records.
Managing Color Status
- Active colors remain fully available for selection across all product‑related workflows.
- Inactive colors can be applied only to existing products that already use them; they are no longer available for new selections.
Editing Colors
Colors that are already assigned to one or more products:
- Can be marked inactive
- Cannot be renamed
- Cannot be deleted
EXAMPLE: The color is in use, so its name cannot be changed.
Colors that have never been assigned can be:
- Renamed
- Marked inactive
- Deleted
EXAMPLE: Editing a product color that has never been assigned
To change a product color name that has never been used, select the color and use the 3-dot (options) button to access EDIT/DELETE functionality. Choose Edit.
Change the name as required. Save.
The new color name will be displayed consistently across the system.
[ALL] Preferred Phone/Email Set as Mandatory
Environment settings > Patient settings > Mandatory fields > Patient/Patient lead
A new enhancement allows administrators to mark the Preferred Phone Number and Preferred Email Address as mandatory fields. This provides more control and ensures that the most important contact details are always captured. This applies to both Patient and Lead records.
In addition, the same mandatory‑field rules now apply when Patient or Lead records are created through the Public API, ensuring consistent validation across both Manage and external integrations.
HOW IT WORKS
- The preferred phone/email field appears with an asterisk (*) on the Patient/Lead form.
- If the field is empty, the system prevents saving and shows a “Required field” message.
- Preferred fields can be required independently or together with other contact (phone, email) fields.
- The configuration applies after saving settings and reopening the Patient/Lead record.
When a Patient or Lead is created or updated through the Public API, the system checks required fields in the same way it does when someone enters the information in Manage — including the rules for preferred and additional contact details.
PATIENTS
[ALL] Improved Handling of Mandatory Contact Fields
Patients > Personal info
Managing contact information in Patient profiles has been improved to ensure clinics always capture the correct required details for whoever is marked as the primary contact. The system now automatically applies required‑field rules based on whether the Patient/Lead or the Additional Contact is selected as the primary contact. The “Use as primary contact” checkbox determines which set of fields must be completed, ensuring that only one person’s contact details are required at a time.
- If the Additional Contact is not marked as primary, only the Patient’s/Lead's contact fields must be completed — even if Additional Contact fields are configured as mandatory in Patient settings.
- If the Additional Contact is marked as primary, only the Additional Contact’s contact fields become required.
- Only one primary contact can be selected, and switching between primary contacts updates required fields instantly without changing previously entered details.
HOW IT WORKS
- Patient/Lead is the primary contact:
The Patient’s phone number and email become mandatory. - Additional Contact is the primary contact:
The Additional Contact’s phone number and email become mandatory, and the Patient’s mandatory fields are no longer required.
- Only one primary contact at a time:
Selecting one primary contact automatically disables validation for the other. - Instant updates:
Changing the primary contact immediately updates which fields are required. - Data is preserved:
Any information already entered remains unchanged when switching between primary contacts.
3. TECHNICAL REQUIREMENTS UPDATE
3.1 Current System Requirements
| Operating systems | Windows 10, Windows 11 |
| Supported browsers | Chrome (latest version), Edge (latest version) |
| Language preferences | English |
| Country layers | UK, AU, US, NZ |
| Bridge version | Bridge BE - 2.5.0 + 2.5.0 |
| Engage version | 1.3.3, 2.0.0 |
| Zapier version | AuditData (4.2.4) |
| Screen resolution | 1920x1200 |
| Internet connection speed | 10Mb/s |
4. SOLVED ISSUES
PUBLIC API
[ALL] Delay Between New Stock Item Creation and Its Availability in the Inventory
- The delay between creating a new stock item and its availability in the Inventory module has been fixed. Stock items are now fully available before the creation notification is sent, ensuring they can be accessed immediately once the notification is received.
SYSTEM
[ALL] Incorrect Due Date/Time Displayed on Recall Tasks in Manage
- The issue caused by the due time being interpreted incorrectly has been fixed. This incorrect time calculation resulted in the due date/time appearing differently across various screens in Manage. The due date and time are now displayed consistently and correctly.
ENVIRONMENT SETTINGS
[ALL] Duplicate Code Limitation in Price Book Setup
Environment settings > Finance settings > Price books
- An issue has been resolved in the Price Books module where the system blocked adding multiple products that shared the same product code. The validation logic has been corrected so that duplicate product codes can now be assigned within the same price book when adding products manually, selecting from the product catalog, or importing via Excel.
INVENTORY
[ALL] Exported Product Files Fail on Re‑Import
Inventory > Product catalog > Export/Import
The issue that prevented exported product files from being re‑imported has been fixed. During migration, some products included vendor numbers with special characters, which did not match Manage’s original validation rules and caused the system to reject the files. To ensure consistent handling of this data and smooth re‑imports, the validation for vendor product numbers has been updated to allow special characters. This change was applied to both product import and product editing in the Product Catalog. Product files exported from Manage can now be re‑imported successfully.
[AU] Incorrect Serial Number Reservation
Inventory > Stock management > Serial number tab
- A problem was resolved where adding multiple serialized items to a sale could result in one of the serial numbers being reserved incorrectly, preventing the Delivery Note from being created. The system now consistently reserves all serialized items when they are added to a sale, ensuring accurate reservation status and allowing Delivery Notes to be generated without issues.
[ALL] Incorrect Color Display After Updating Product Item
Inventory > Stock management
- An issue was resolved where changing the color of a product item did not update correctly. Instead of showing the newly selected color, the system continued to reference the previous one. This has now been fixed so that the updated color is always recorded and communicated accurately.
Related Articles
Public Release Notes - Manage 11.8.0
About this release December 2, 2025, Manage 11.8.0 Manage 11.8.0 introduces powerful new capabilities to enhance operational flexibility, improve patient engagement, and deliver more accurate reporting — all designed to reduce manual effort and ...Public Release Notes - Manage 11.11.0
About this release March 3, 2026, Manage 11.11.0 Manage 11.11.0 introduces enhanced localization, smarter finance workflows, improved documentation automation, stronger scheduling controls, and expanded API capabilities, along with usability ...Public Release Notes - Manage 11.2.0
About this release June 2nd, 2025 Manage 11.2.0 We’re excited to announce Manage 11.2.0, a release packed with enhancements that improve control, accuracy, and flexibility across your workflows. From refined financial permissions to smarter patient ...Public Release Notes - Manage 11.9.0
About this release January 5, 2026, Manage 11.9.0 Manage 11.9.0 introduces updates across Environment settings, Reporting, Patient management, and Public API. This release focuses on improving patient clarity during Online Booking, enhancing ...Public Release Notes - Manage 11.14.0
About this release June 2, 2026 – Manage 11.14.0 Manage 11.14 brings more flexibility to reporting, stronger inventory and financial visibility, improved stock adjustment tracking, expanded integration capabilities, and expanded Australian HSP ...